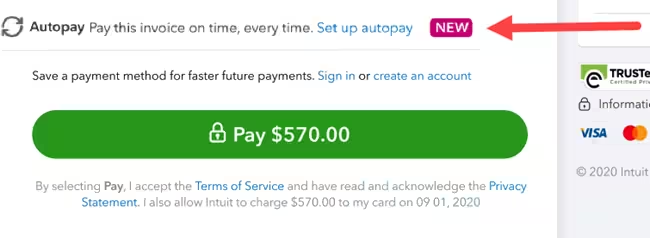
Learn how to set up automatic payments for recurring invoices! QuickBooks Online’s Autopay lets you make payments for recurring invoices automatically. You can sign up and enter your payment info through the invoice. Your payments will process automatically for future recurring invoices.
To setup Autopay:
1. Open your invoice and select “Set up autopay” to enroll.
2. Next, you will need to sign in using an Intuit user ID (also used for TurboTax and Mint). If you need to set one up, please see further instructions below.
3. You need to make sure the autopay checkbox shows as selected and displays the correct frequency and start date.
4. Once everything looks good, select the Autopay button to pay the current invoice. You will receive a confirmation email that Autopay is set up.
_____________________________________________
**Why am I still receiving an invoice via email, I am set up on Autopay?**
You will receive the invoice email normally, but it should reflect a zero balance, pending payment, or Autopay scheduled payment depending on the due date for the invoice.
**Can I change the amount of the Autopay?**
Autopay can only be set up for the full amount. If you edit the amount, then the Autopay option no longer displays.
**How do I set up an Intuit account?**
You need an Intuit account to use Autopay. If you don’t have an Intuit account, you’ll need to create a new login (https://accounts.intuit.com/index.html?_ga=2.176293925.1061788638.1732654131-1548149096.1708010766).
**What kind of payment methods can I use to set up an Autopay?**
You can use debit or credit card, or ACH transactions.
**When will my payment be processed?**
Auto payments are deducted either:
– 3 days before the invoice due date;
– immediately if it’s less than 3 days, if an invoice is due on receipt; or
– as soon as the invoice is batched, if the invoice is due on receipt.
**How do I update my payment method(s) already set up in Autopay?**
You can select “Manage Payment” in the autopay confirmation email to update payment info. Some credit cards should auto-update the expiry date on the stored credit card with the new info. If you would like to make the change manually, you can cancel the autopay and set up a new autopay with different card details.
**Can I cancel my Autopay?**
You can cancel autopay from your Autopay confirmation email. Select “Manage payment” in the confirmation email. Sign into your Intuit Account. Select “Cancel autopay”. If Autopay gets canceled, you will receive a cancelation email for future Autopay transactions. Note: Individual payments can’t be canceled.
**What if my payment gets declined?**
If a payment is declined, an email is sent to you to let you know. Once the payment info is updated, the payment will be taken immediately. You can also choose to re-enroll in Autopay with the new info.


